How to use moodle (installation)

What is moodle?
Moodle is an open source e-learning platform. It has a relatively large number of users for a system of its kind.
Moodle is a software package that helps educators to create high quality online learning processes (courses). Such e-learning systems are called Learning Management System (LMS), Course Management System (CMS), Virtual Learning Environment (VLE), or simply Online Education System: Virtual Learning Environment (VLE), or simply Online Education System.
Excerpt from wiki
Preparing the server where moodle will be installed
If you want to use moodle in your school or business, you will probably need a dedicated server. In recent years there have been a number of rental servers available, and many people have chosen to use these.
In this article, we'll use EC2 within AWS (AmazonWebService).
Do not register with AWS, and you will come to the EC2 screen.

An instance is a server. So, to create a new instance, click on "Create Instance".
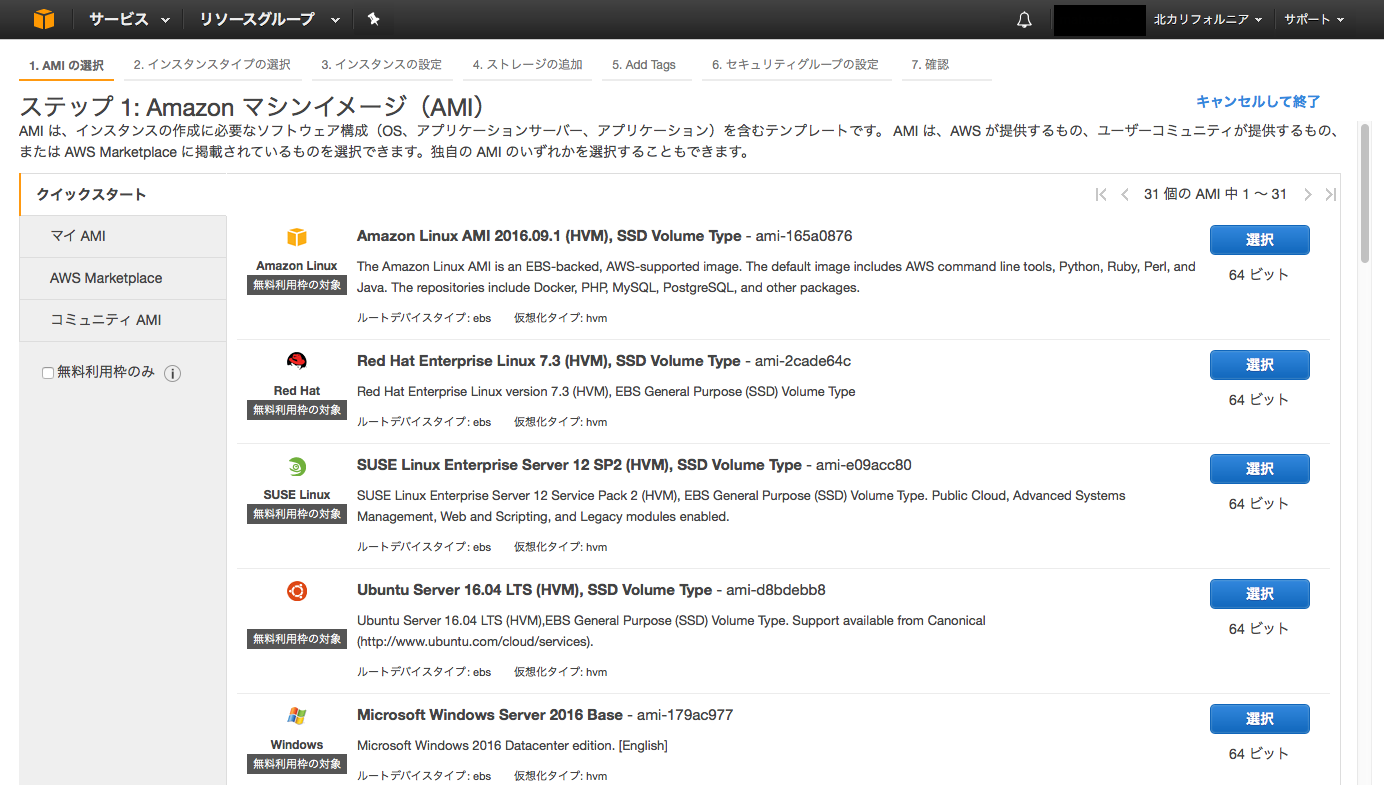
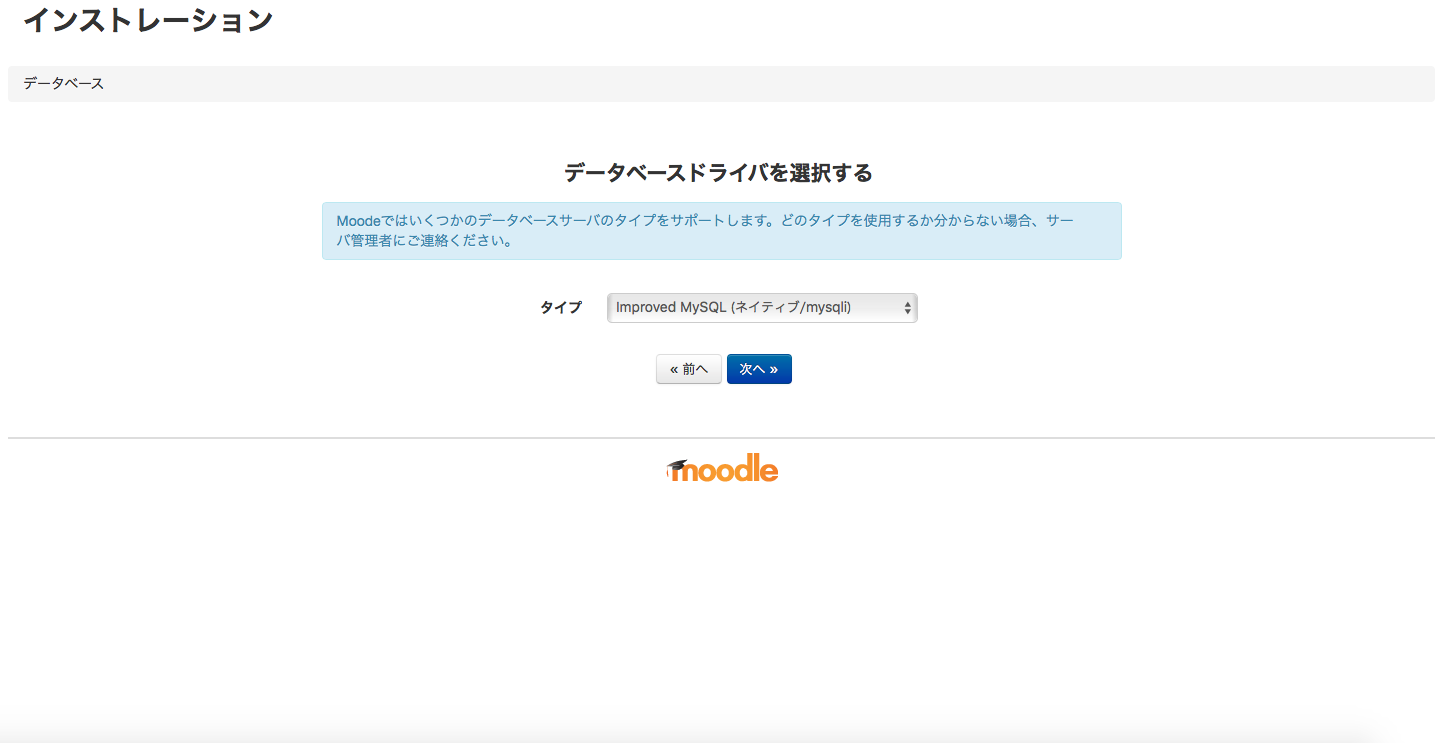
Select the software (AMI in this case)
Select the software for your instance. In this article, we will use AMI.
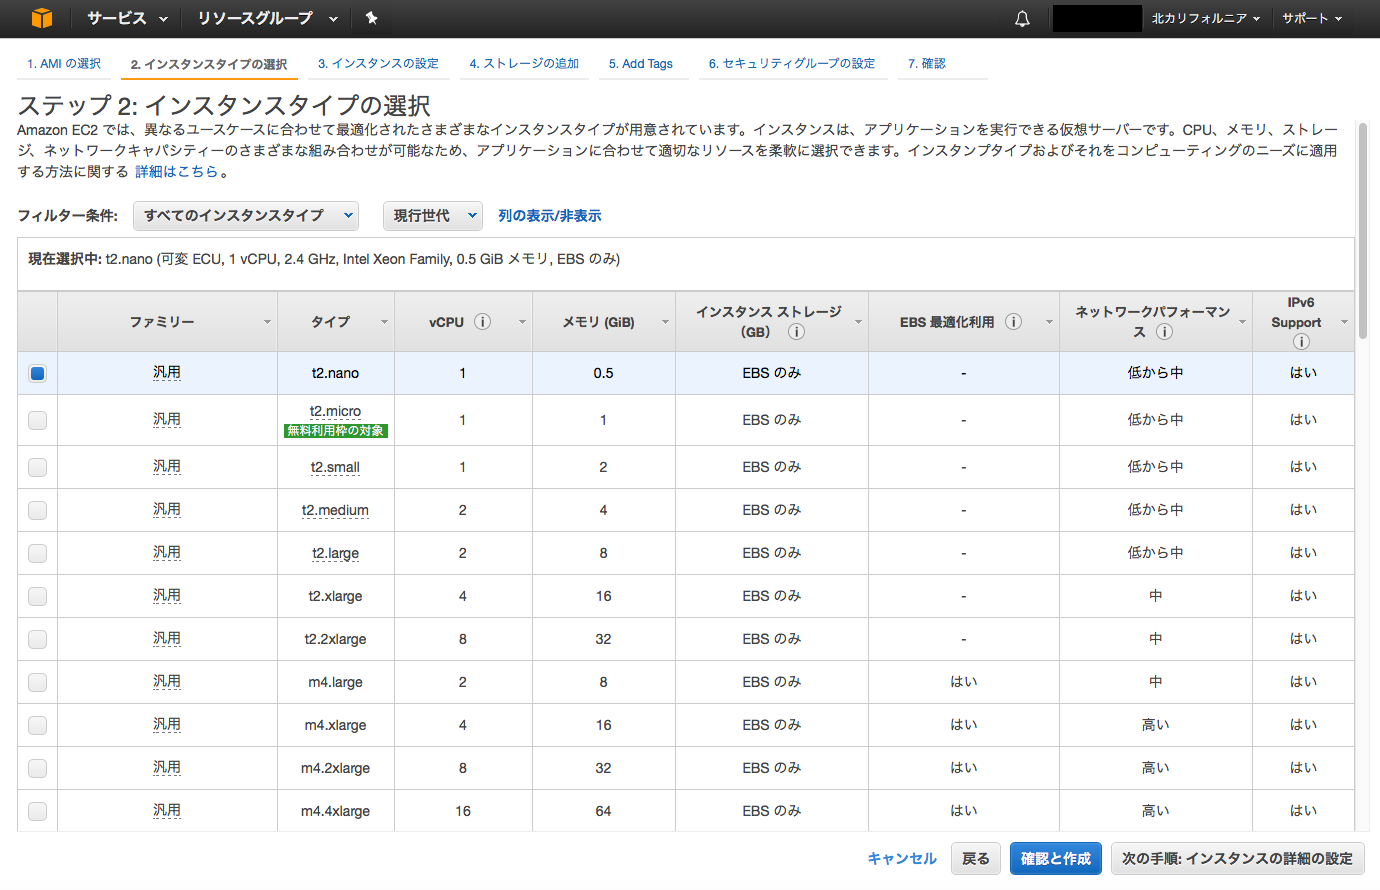
Selecting an Instance Type
Select the instance type. The performance and price will change depending on the type. Even t2.nano with the lowest specification can be operated sufficiently.

Advanced Instance Settings
Advanced settings, but the default settings are fine this time.
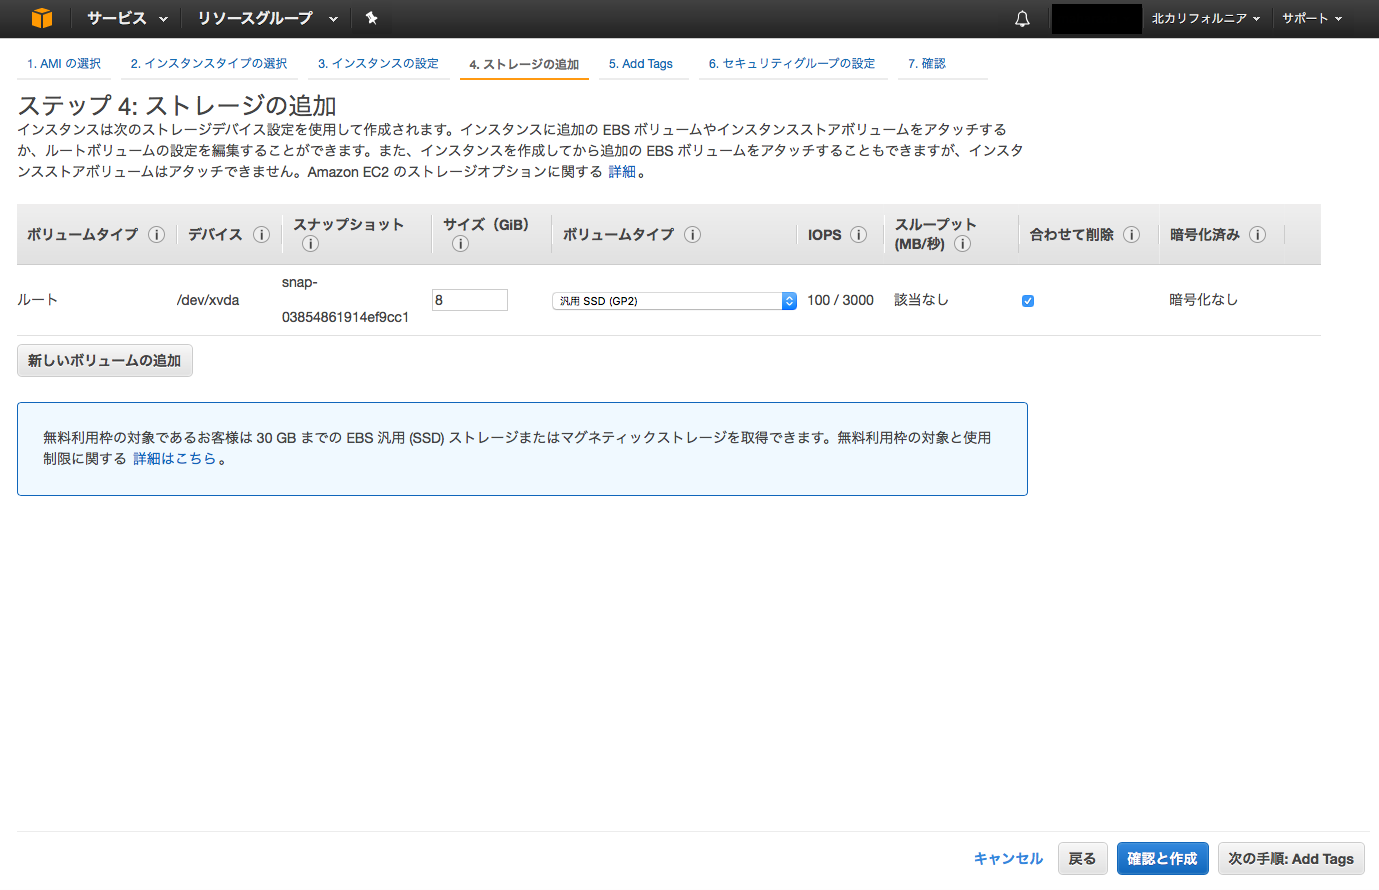
Adding Storage
It is the addition of the storage, but this time it is all right with the default setting.
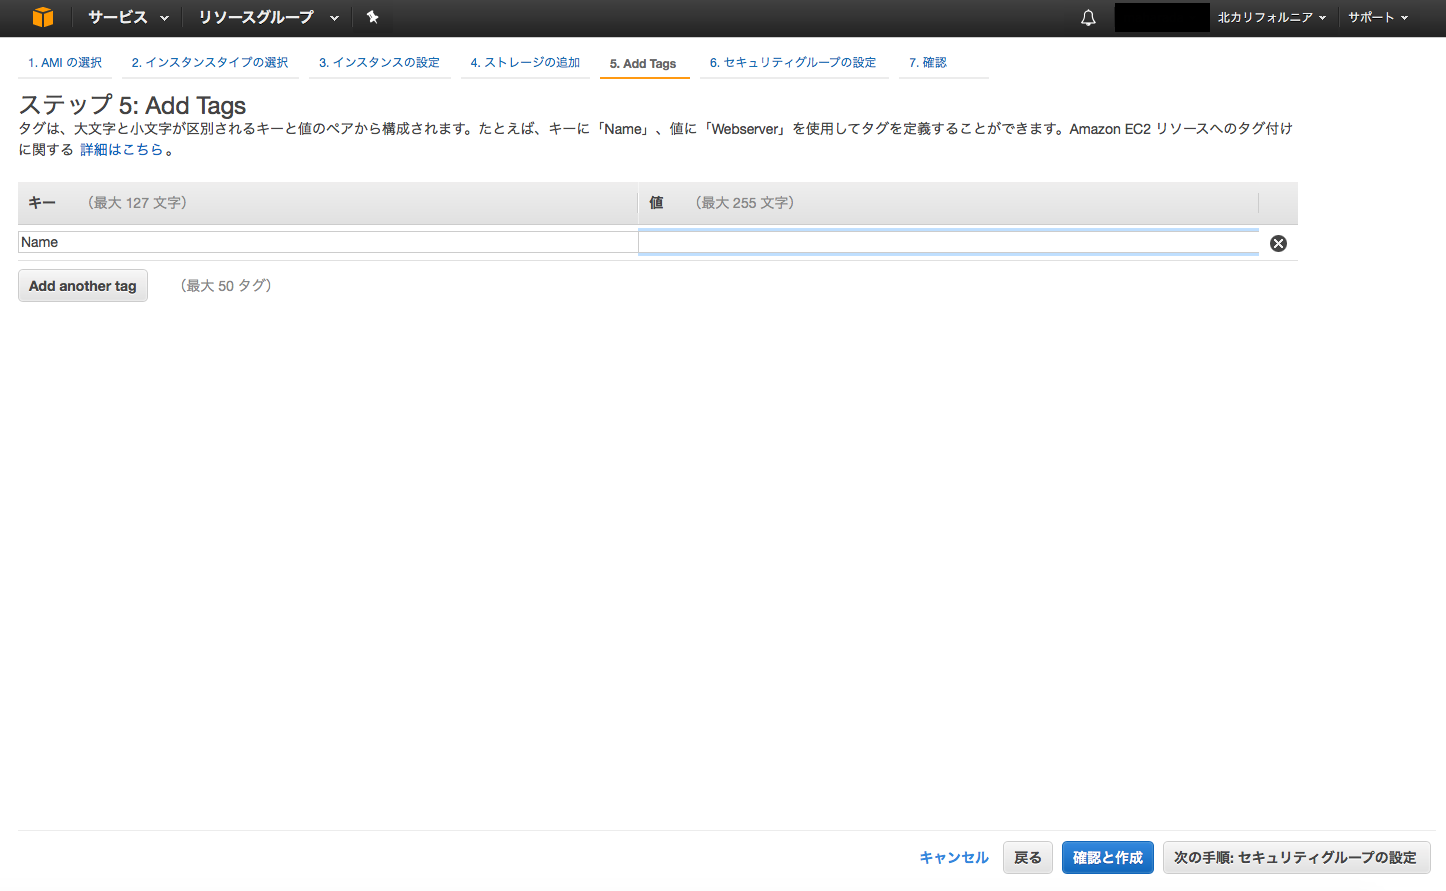
tagging
tag to make it easier to identify the instance. You don't need to add anything in particular.

Setting up a security group
This is the security group setting. You can set the access restriction, and add HTTP to the rule because HTTP is also accessed. You can change the security group at any time, so please set your own security group when you actually use it.
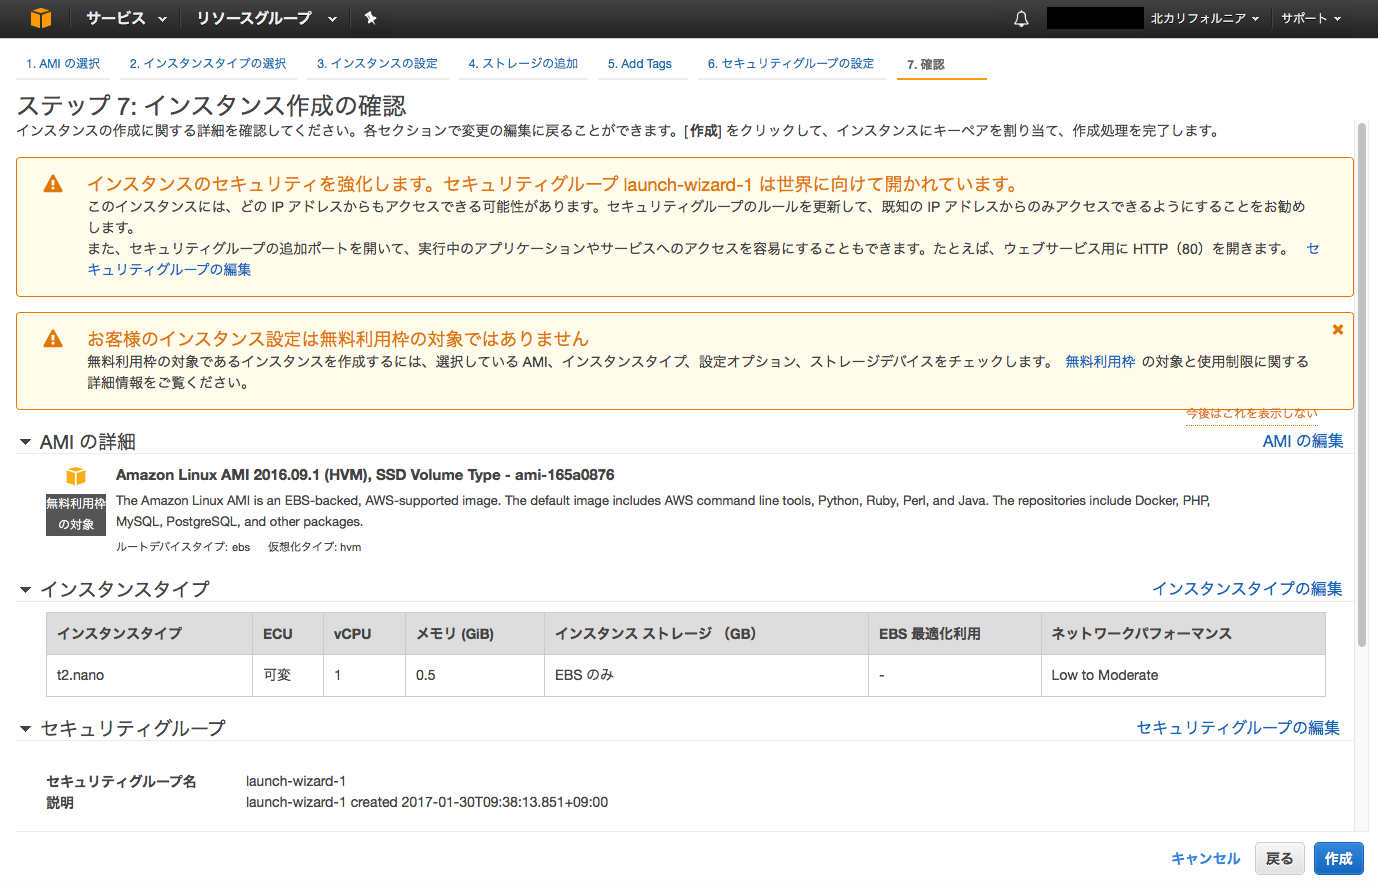
confirmation
Finally, check the information. If all is well, click "Create".

The instance is now up and running. Next, we'll prepare the contents of the instance.
Connect with SSH
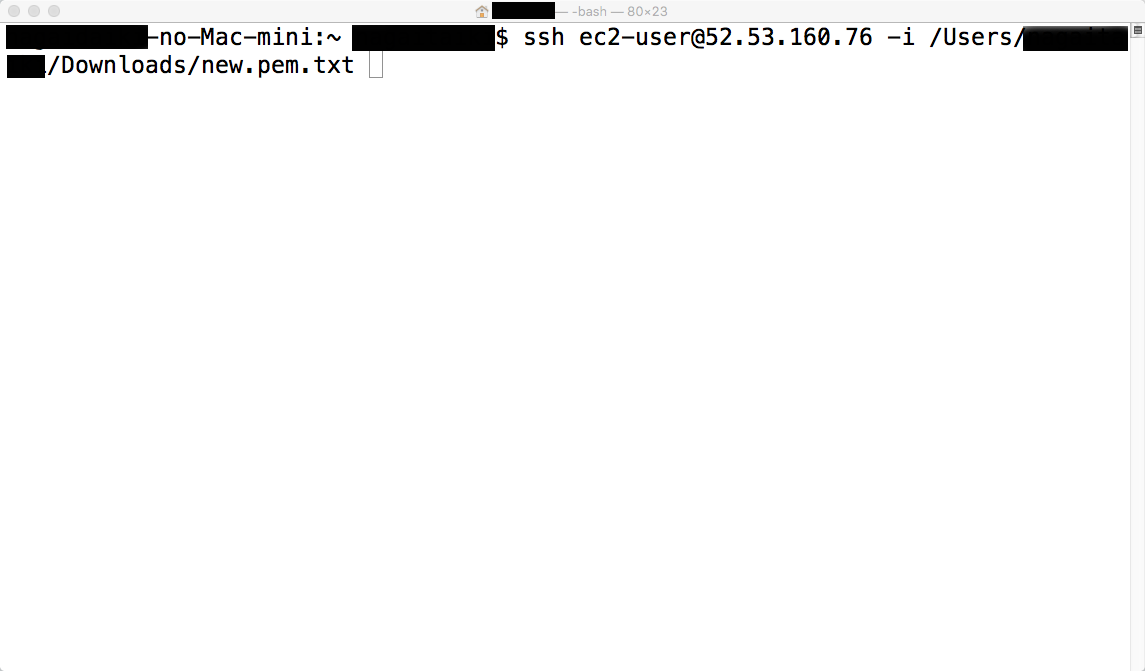
Start up a terminal and access with SSH. You can access with "ssh username@IP address -i configured key pair". The black part is private information, so I hide it.
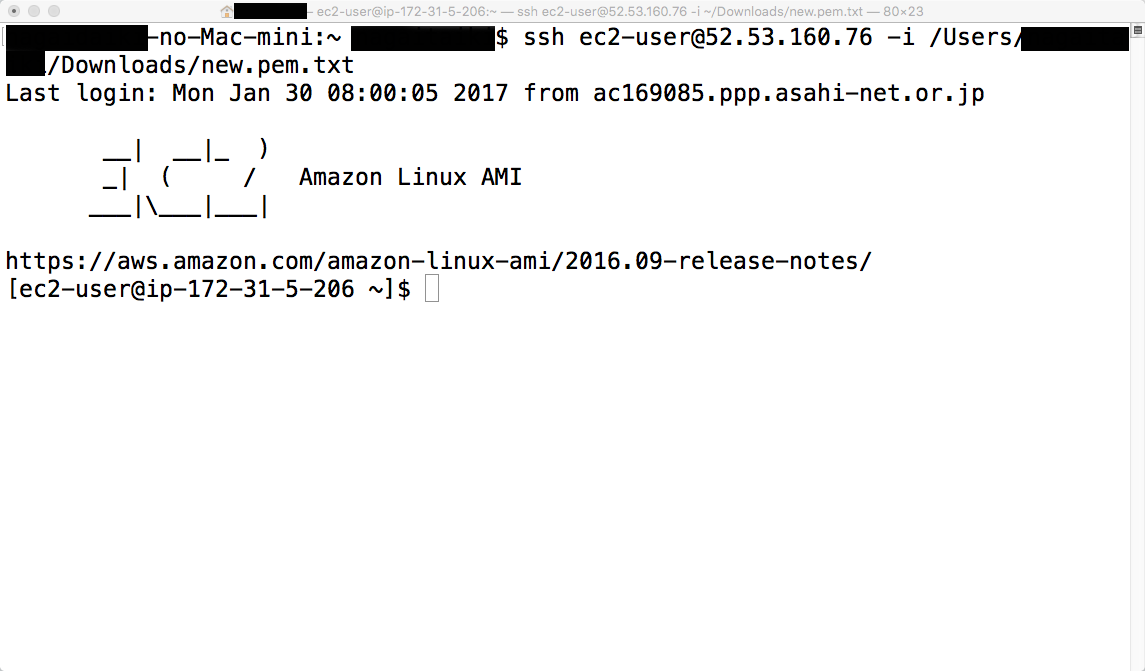
If the access is successful, it will be displayed as shown in the image.
The next step is to set up the minimum environment for using moodle.
First of all, change to root by "sudo -i". If the $ displayed before the command is changed to #, you are root.
Install apache
Install apache. Enter "yum install -y httpd24".
Once the installation is complete, enter "chkconfig httpd on" to set up automatic startup of apache.
Enter "vim /etc/sysconfig/i18n" to set the language setting to Japanese, rewrite "LANG=ja_JP.UTF-8" and save it.
Enter "cp /usr/share/zoneinfo/Asia/Tokyo /etc/localtime" to set the time to use the Tokyo standard. You will be asked if you want to rewrite the file, so answer "yes".
Now that the configuration is complete, enter "service httpd start" to start apache.
Enter "service httpd status" to check if it is running. If you see "httpd (pid ****) is running...", it is running. is running..." is displayed.
If you access http://XXX.XXX.XXX.XXX(GlobalIP:IP when you connect with SSH) and you can see apache page, it's OK.
Install PHP
Install apache. Enter "yum install -y php56".
Next, change the PHP time to Japan. Enter "vim /etc/php.ini".
php.ini is a long file, so type "/date.timezone" to search for it. Change ";date.timezone =" to "date.timezone = 'Asia/Tokyo'" and save it.
Install Mysql
Install Mysql. Enter "yum install -y mysql-server". After the installation is complete, enter "chkconfig mysqld on" to set the automatic startup of Mysql.
Start mysql with "service mysqld start". Enter "service mysqld status" to check if it is running. If you see "mysqld (pid ****) is running... is running..." is displayed, Mysql is running.
Next, set the Mysql password.
Enter "mysql -uroot" and login as root.
Enter "set password for root@localhost=password('pass');" for the query, where "pass" should be the proper password. Then log out with "exit".
Next, set the security. Enter "/usr/bin/mysql_secure_installation". You can configure the settings interactively. Please input as follows.
Enter current password for root (enter for none): (the password for the MySQL:root user you just used)
"Change the root password? [Y/n] n
"Remove anonymous users? [Y/n] Y
"Disallow root login remotely? [Y/n] Y
"Remove test database and access to it?" [Y/n] Y.
"Reload privilege tables now? [Y/n] Y
Now that you have changed the configuration, restart Mysql by typing "service mysqld restart".
Install phpMyAdmin
To operate Mysql, phpMyAdmin is useful, so install this too.
Enter "yum --enablerepo=epel install -y phpMyAdmin".
Type "vim /etc/httpd/conf.d/phpMyAdmin.conf" and press
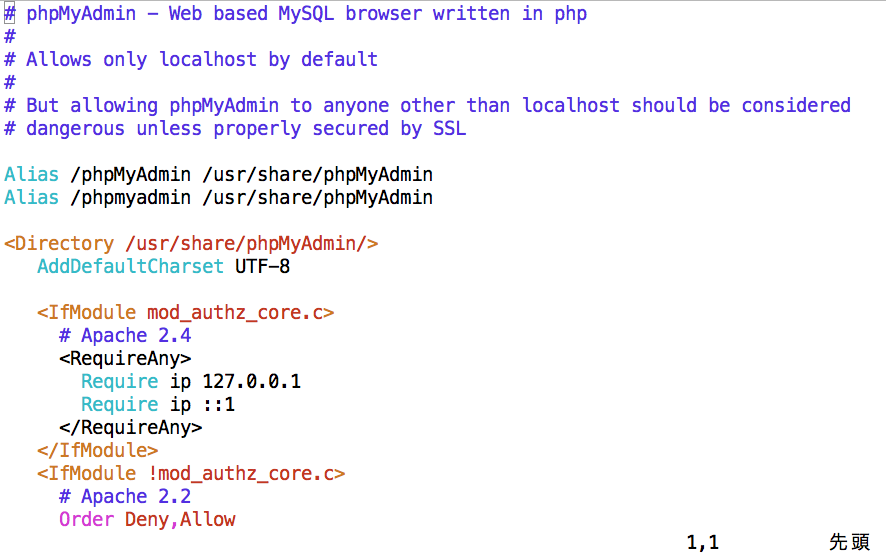
Before change

after change
and save it.
Once the changes are made, restart apache by entering "service httpd restart" for them to take effect.
Install moodle
To install moodle, download the latest version of moodle from the download page on the official moodle website, anything in tgz will do.
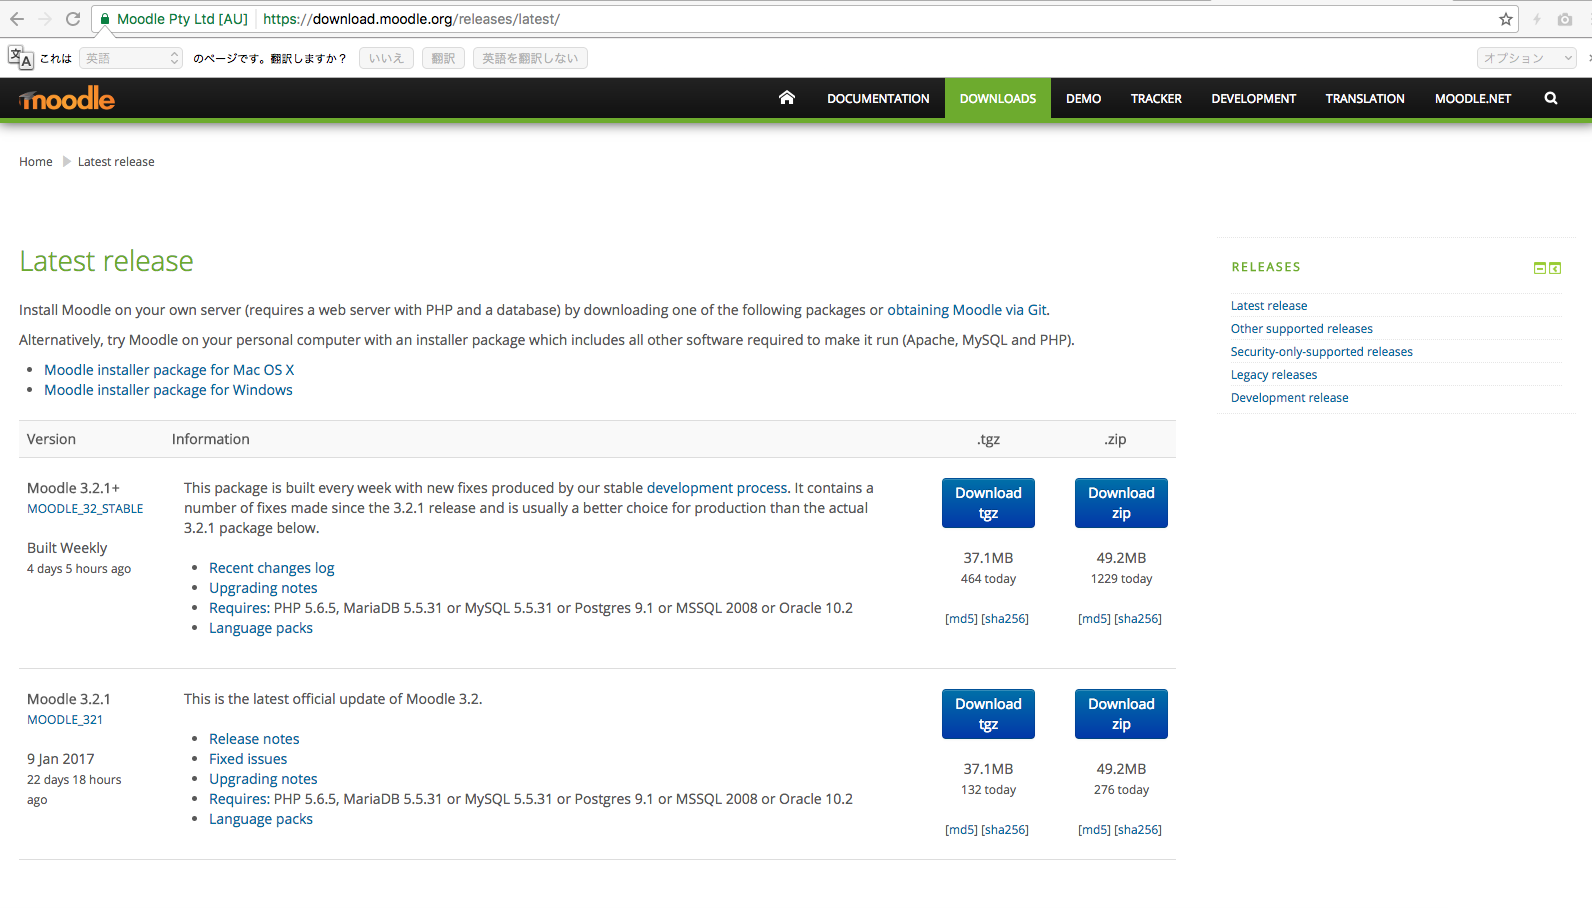
https://download.moodle.org/releases/latest/
You will need to copy the moodle files you have downloaded to your server. There are many ways to do this, but this time I will show you how to do it using "Cyberduck".
Download "Cyberduck" and launch it. Click "New Connection" and enter the information as shown in the image.
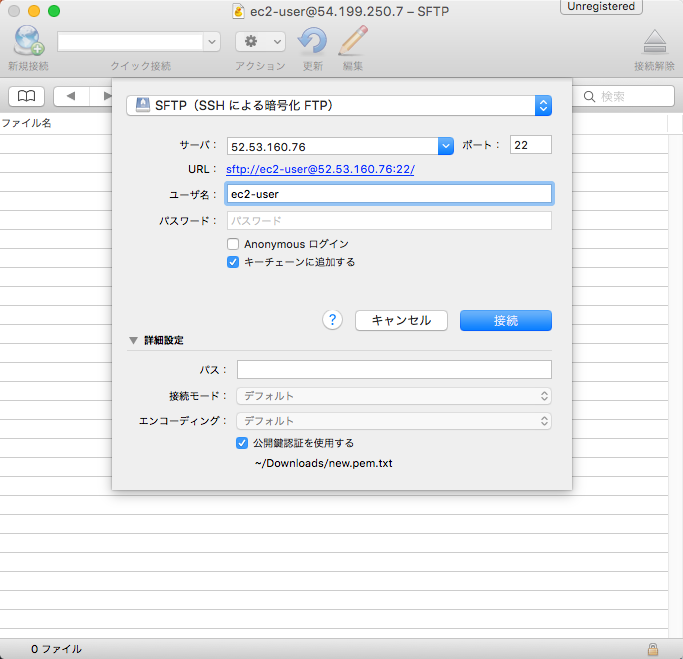
Enter the IP you connected to the server with SSH
When you connect, you should see "/home/ec2-user" and you can drag and drop the moodle file you downloaded to the server.
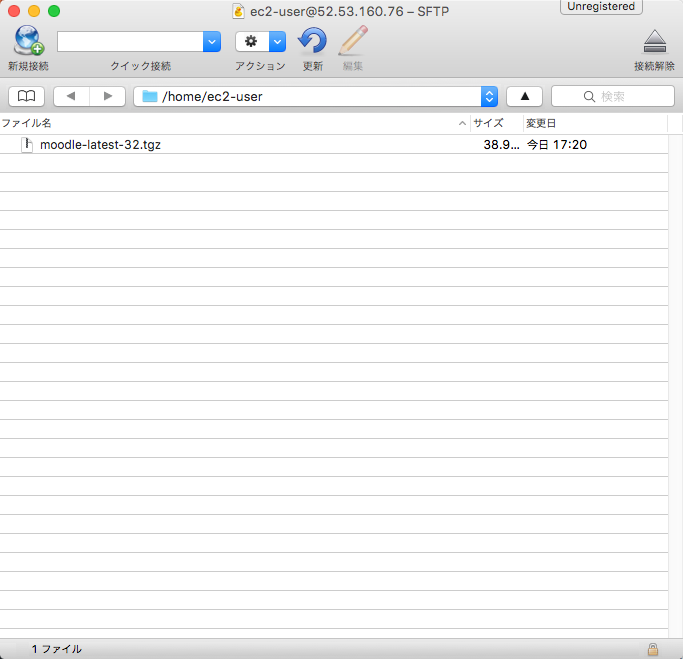
Upload as is without unzipping
Operate the terminal again.
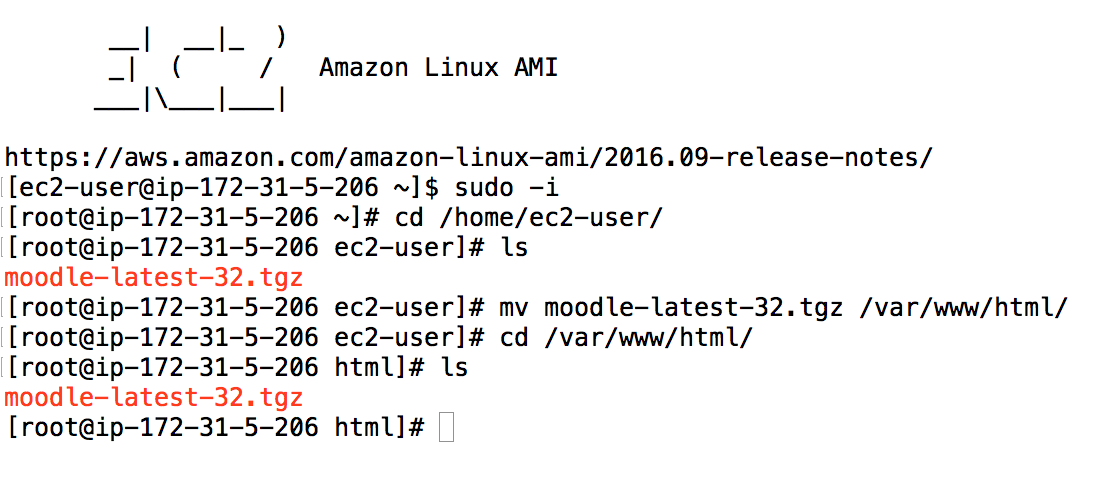
Go in as root, make sure the file you uploaded exists, move the file, and make sure the move is complete
I moved the uploaded files to "/var/www/html".
In the continuation, this time, create a folder named "moodledata" in "/var/www".
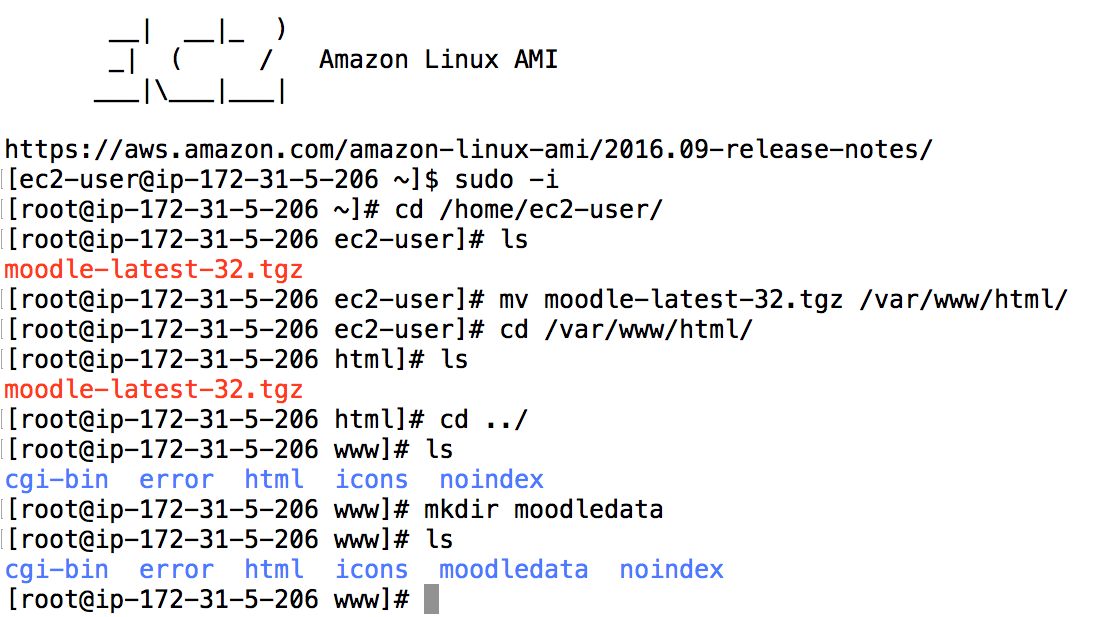
mkdir moodledata to create a folder with the name moodledata
If this is the case, moodle will not be able to write to it, so change the permissions.

chmod 777 moodledata changes moodledata so that anyone can operate it
If the permission of moodledata is "drwxrwxrwx", it is OK.
The last step is to unzip the moodle files. Navigate to "/var/www/html" and unzip the file using "tar xvzf filename".
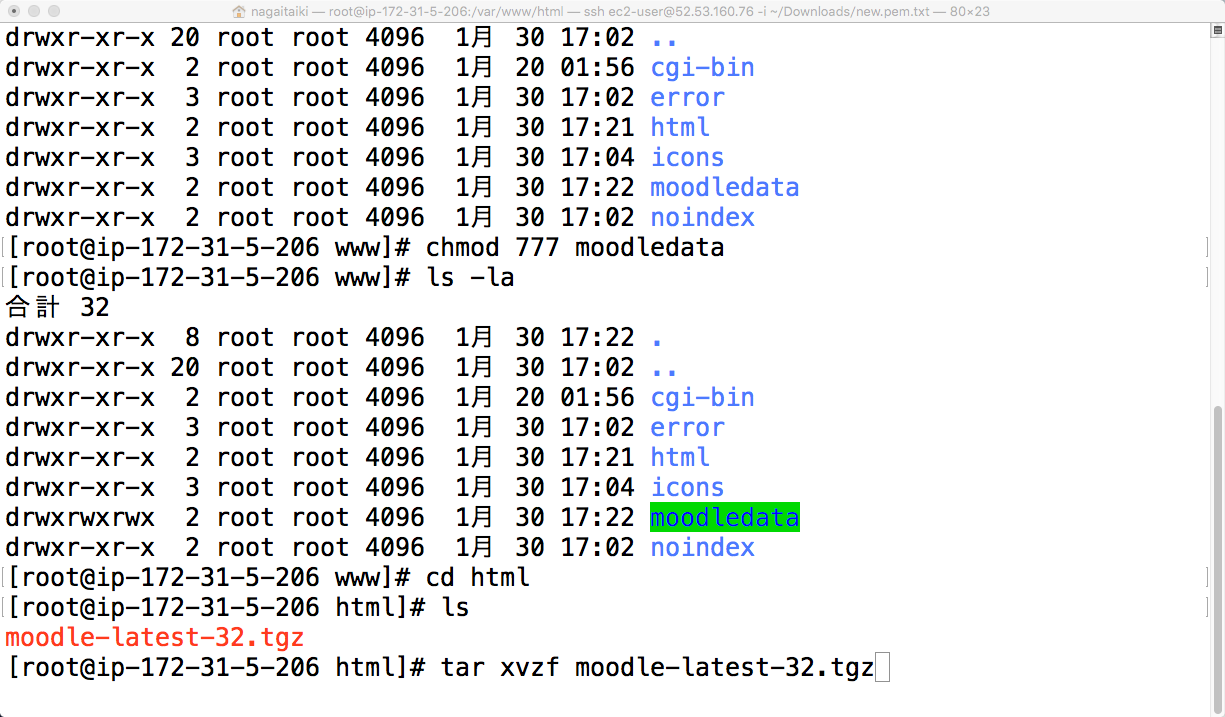
This is the tgz decompression command.
http://XXX.XXX.XXX.XXX/moodle
and set Japanese from the pull-down in the center, it will look like the image below.
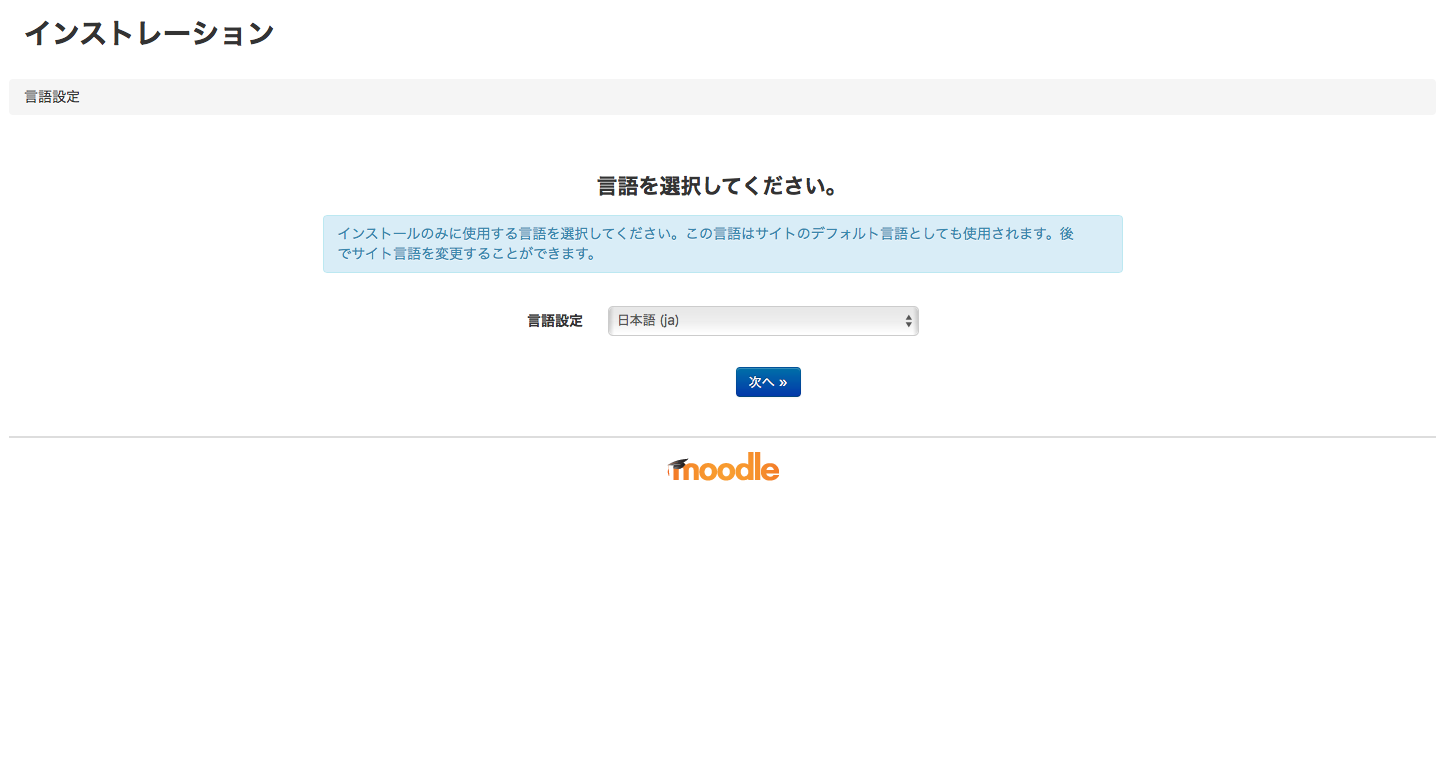
Initial moodle setup page
The installation is now complete.
Initial setup of moodle
Initial moodle setup page
If you've come this far, you've got one more step to go. Click Next.
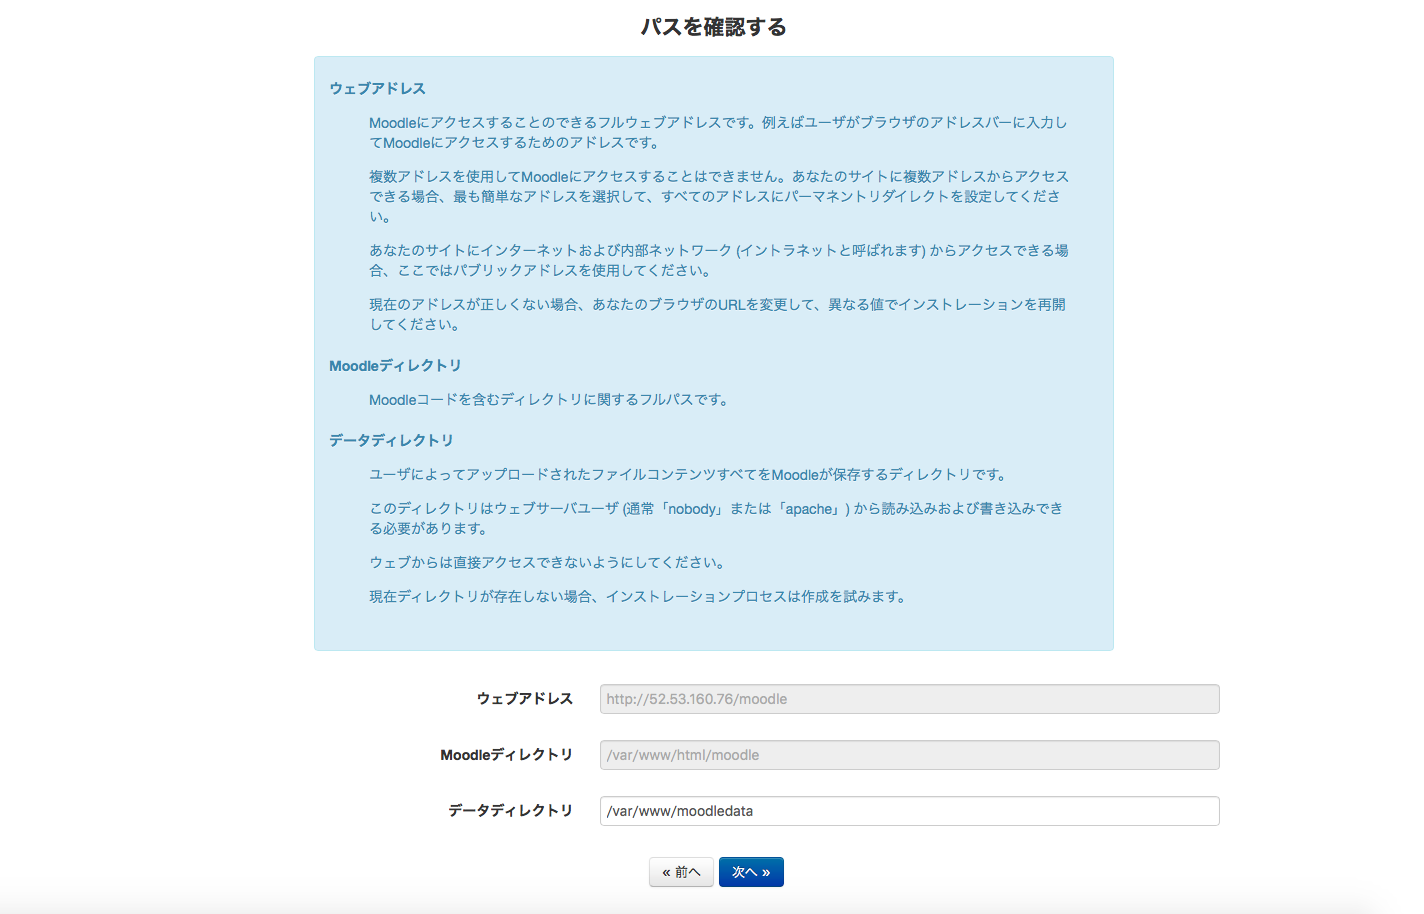
The moodledata is prepared, so click "Next".
Click "Next".
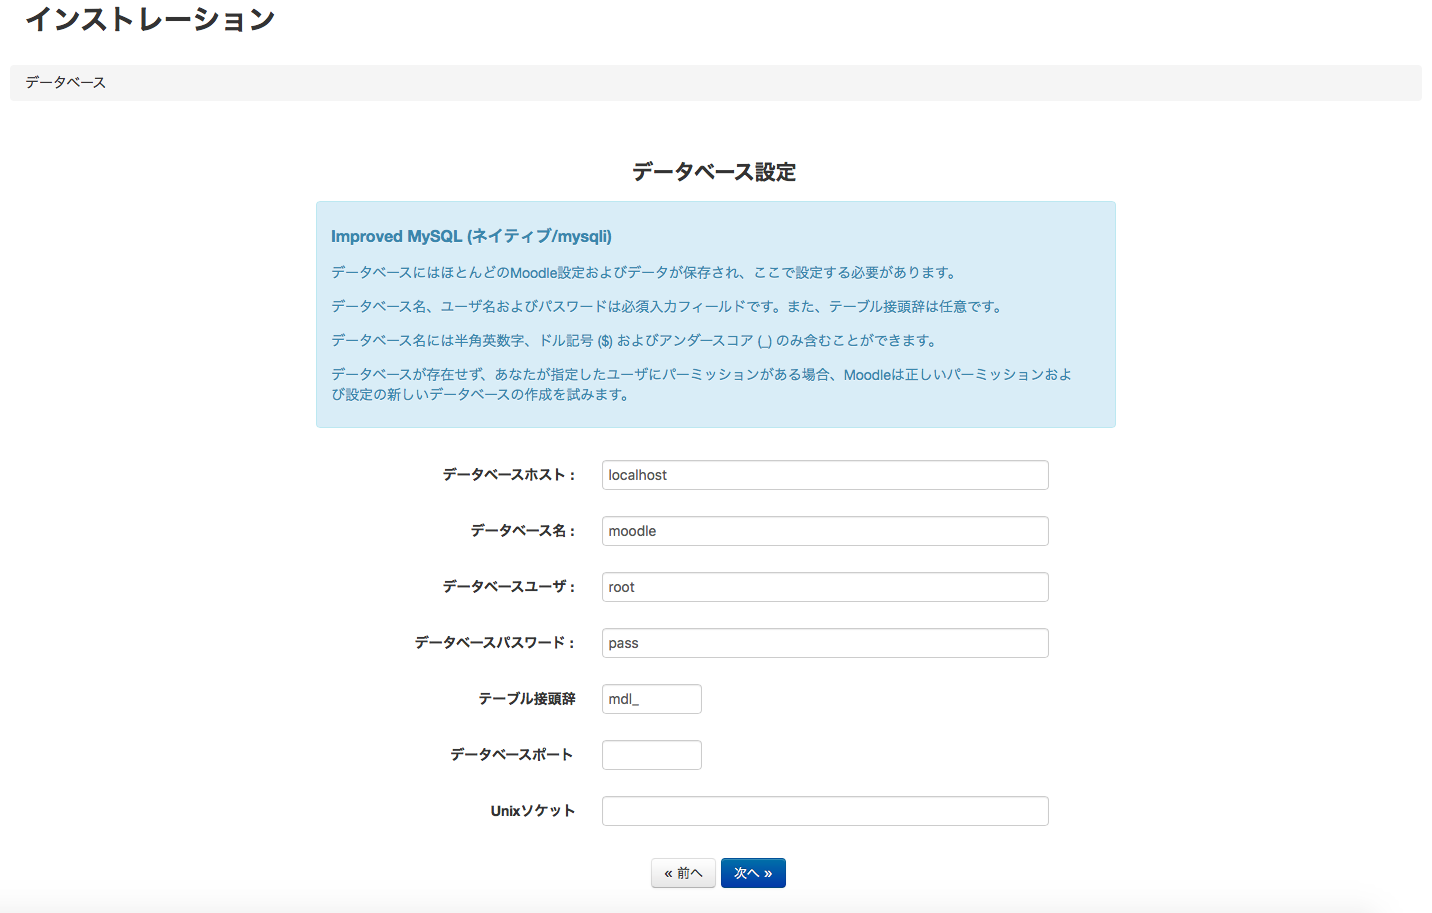
The user is root, the password is the one you set in Mysql, and click Next.

It goes down a bit more.
I was pissed that I couldn't create config.php, so I started terminal three times and connected via SSH.
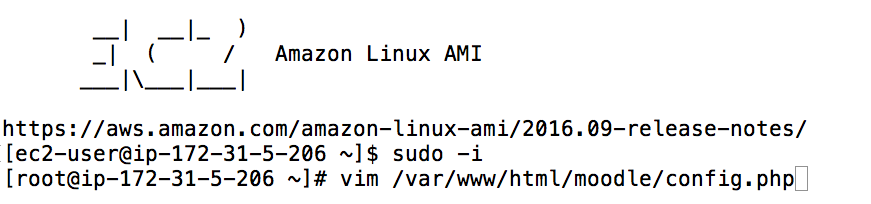
terminal
Enter as root and type "vim /var/www/html/moodle/config.php". copy all the php code from the moodle default page and save it. Then click next.
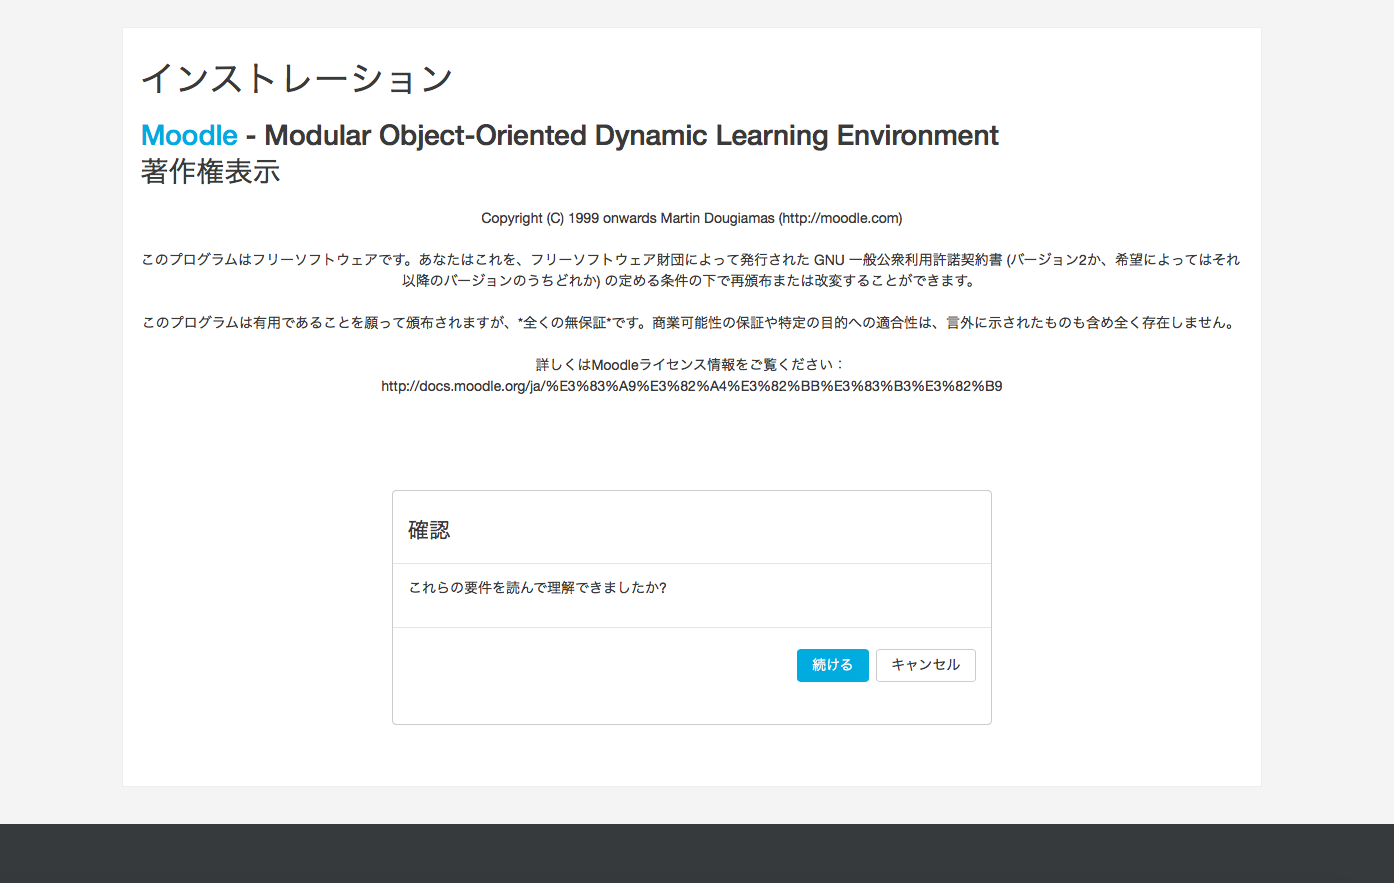
copyright free
It says that it is copyright free and you can use it as you wish. Click Continue.
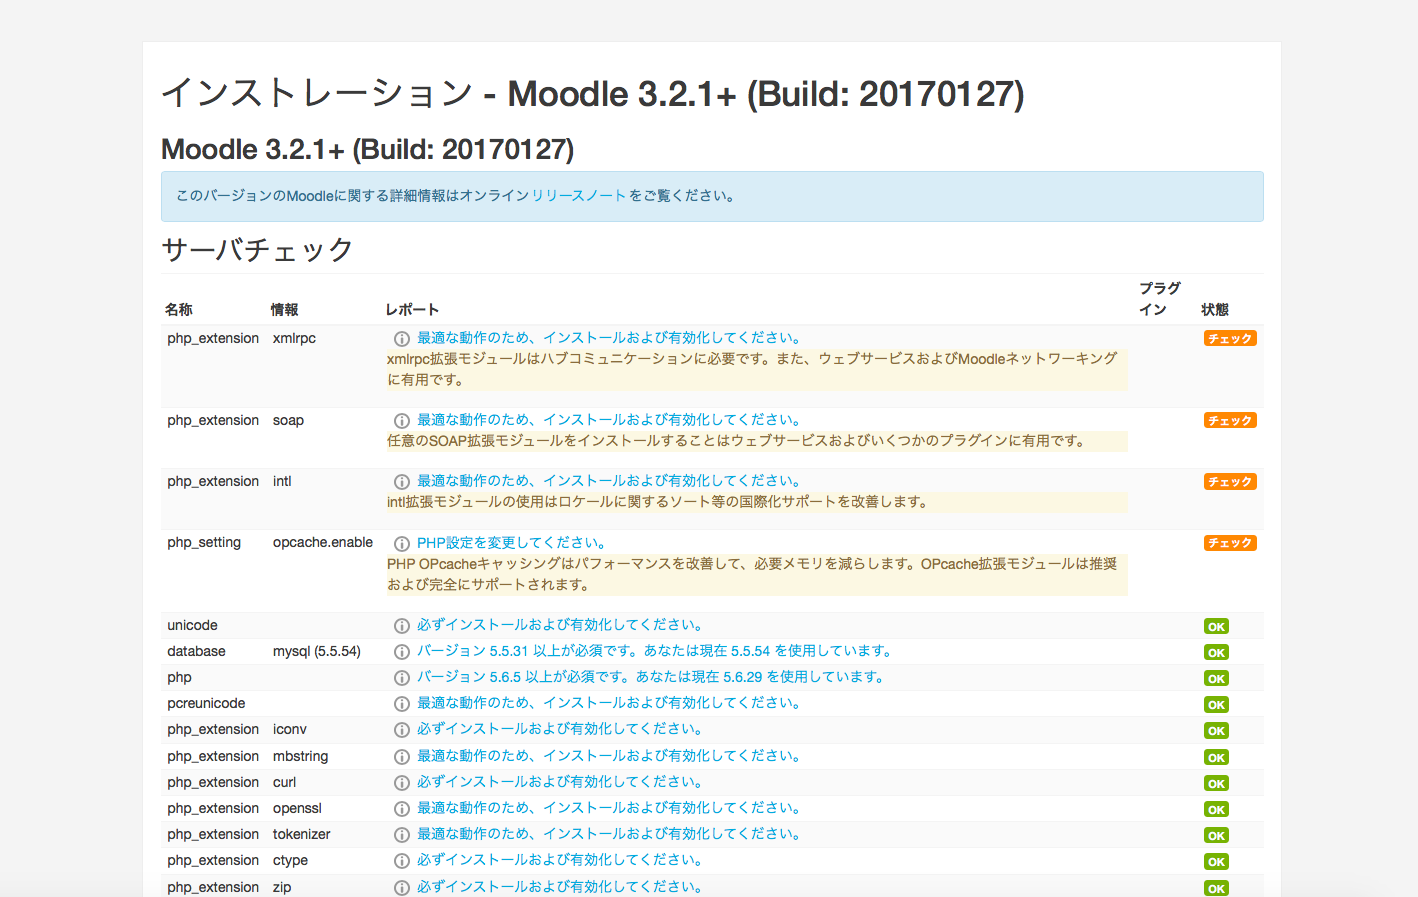
The programs used by moodle will be checked.
You will be checked for the operating environment. The minimum environment is ready, so click Continue.
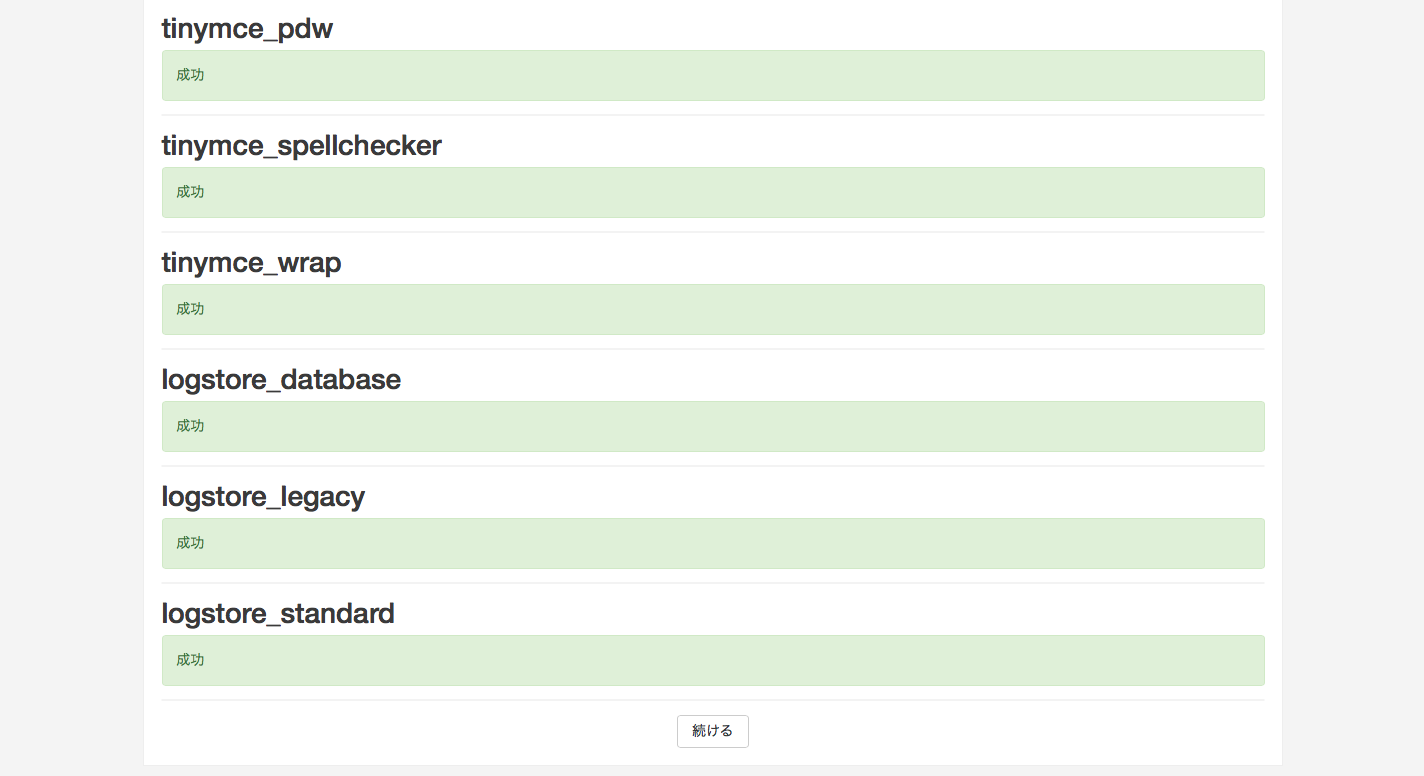
Please wait a moment.
It will take a little time to check. When all the checks are complete, the screen will scroll to the bottom. Click Continue.
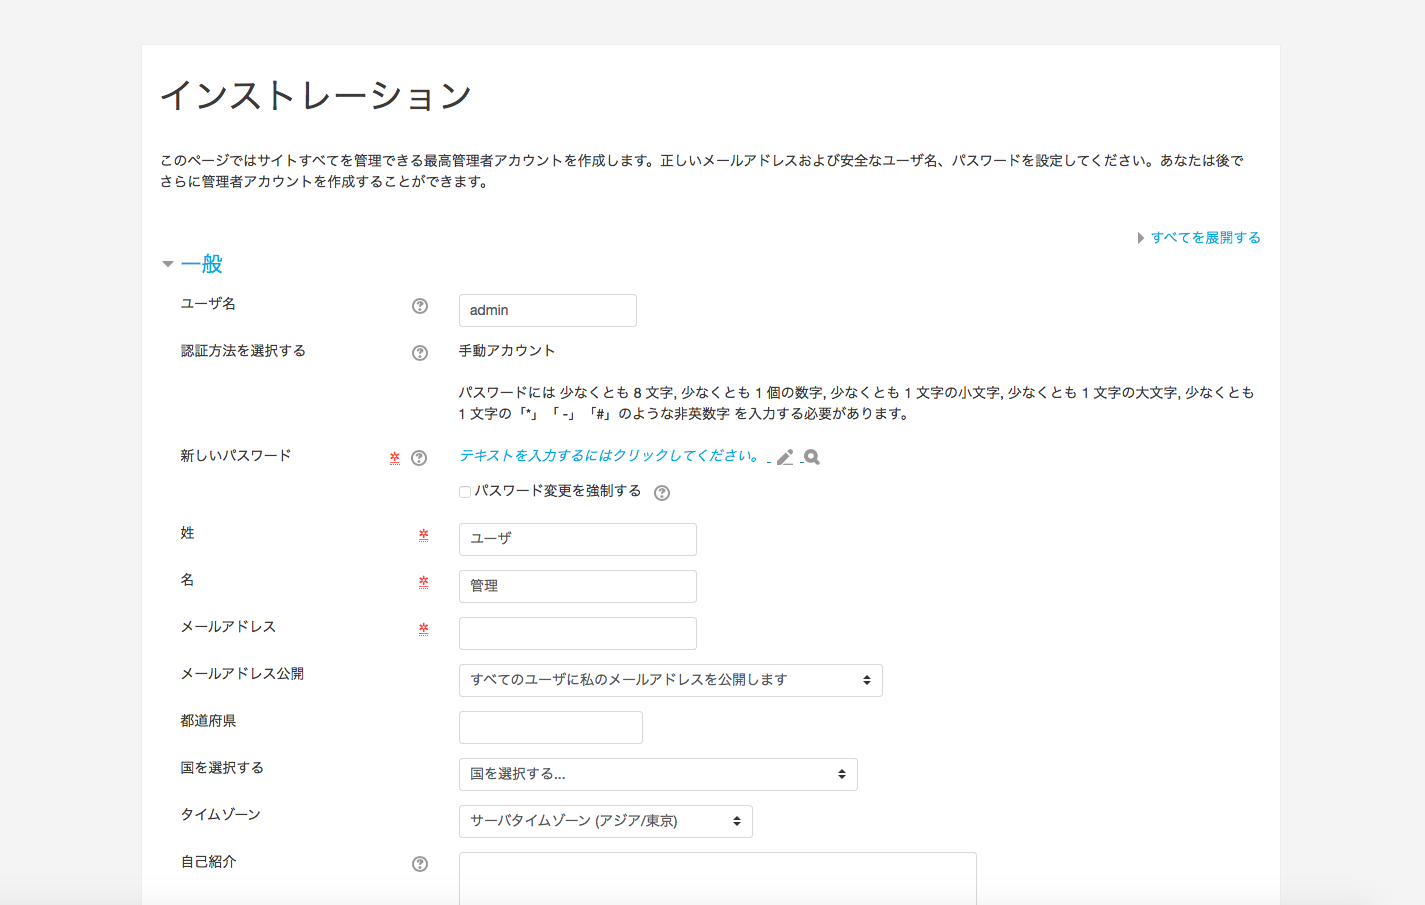
Register an administrator who can perform all operations.
Register a user who can handle all functions according to the screen.
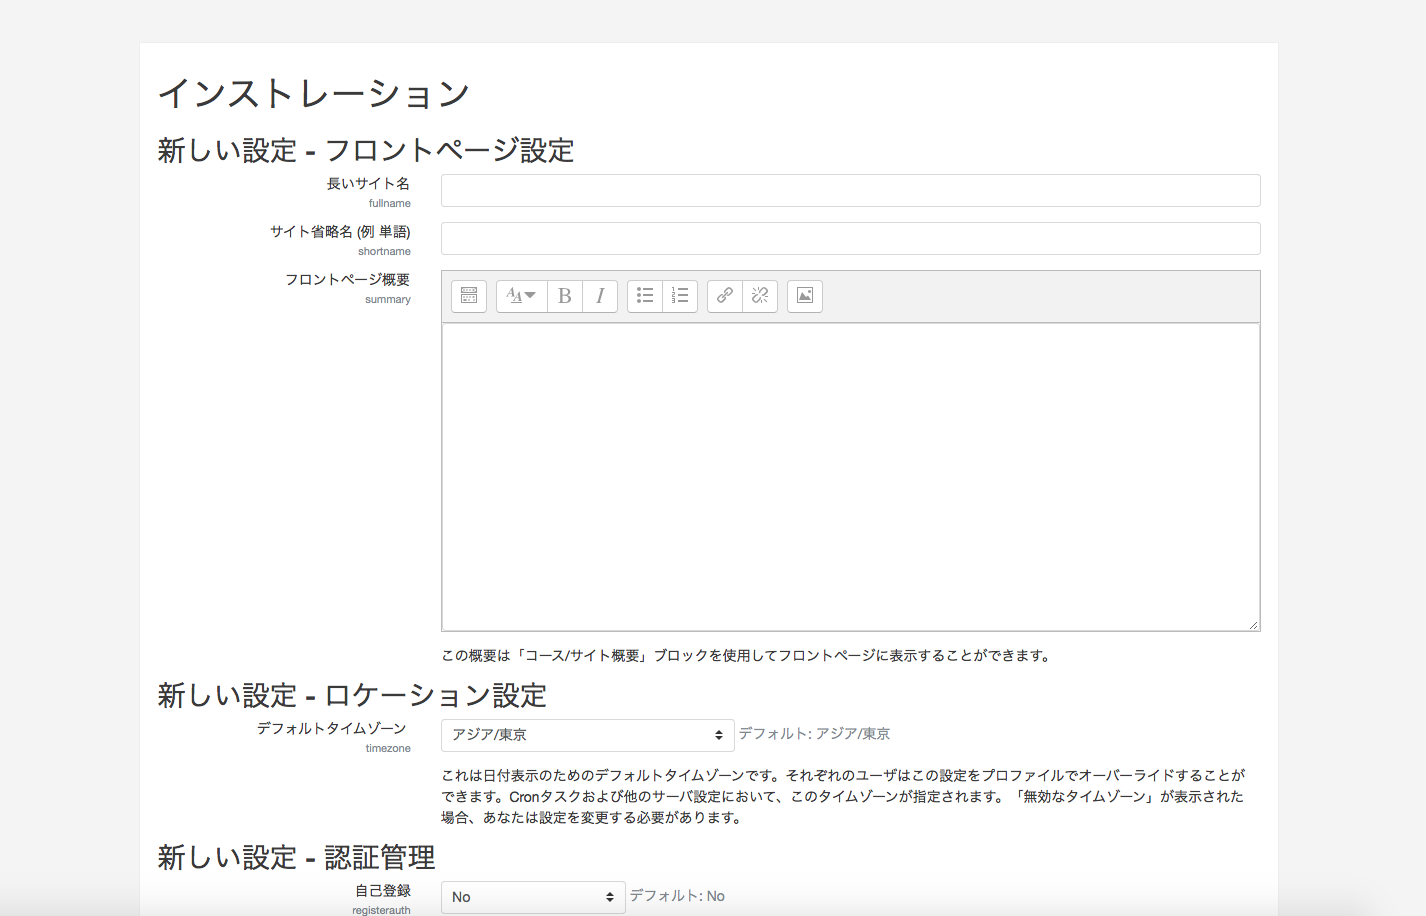
Setting up the moodle top page etc.
Configure the site name and other settings. The settings can be changed, so feel free to enter them.
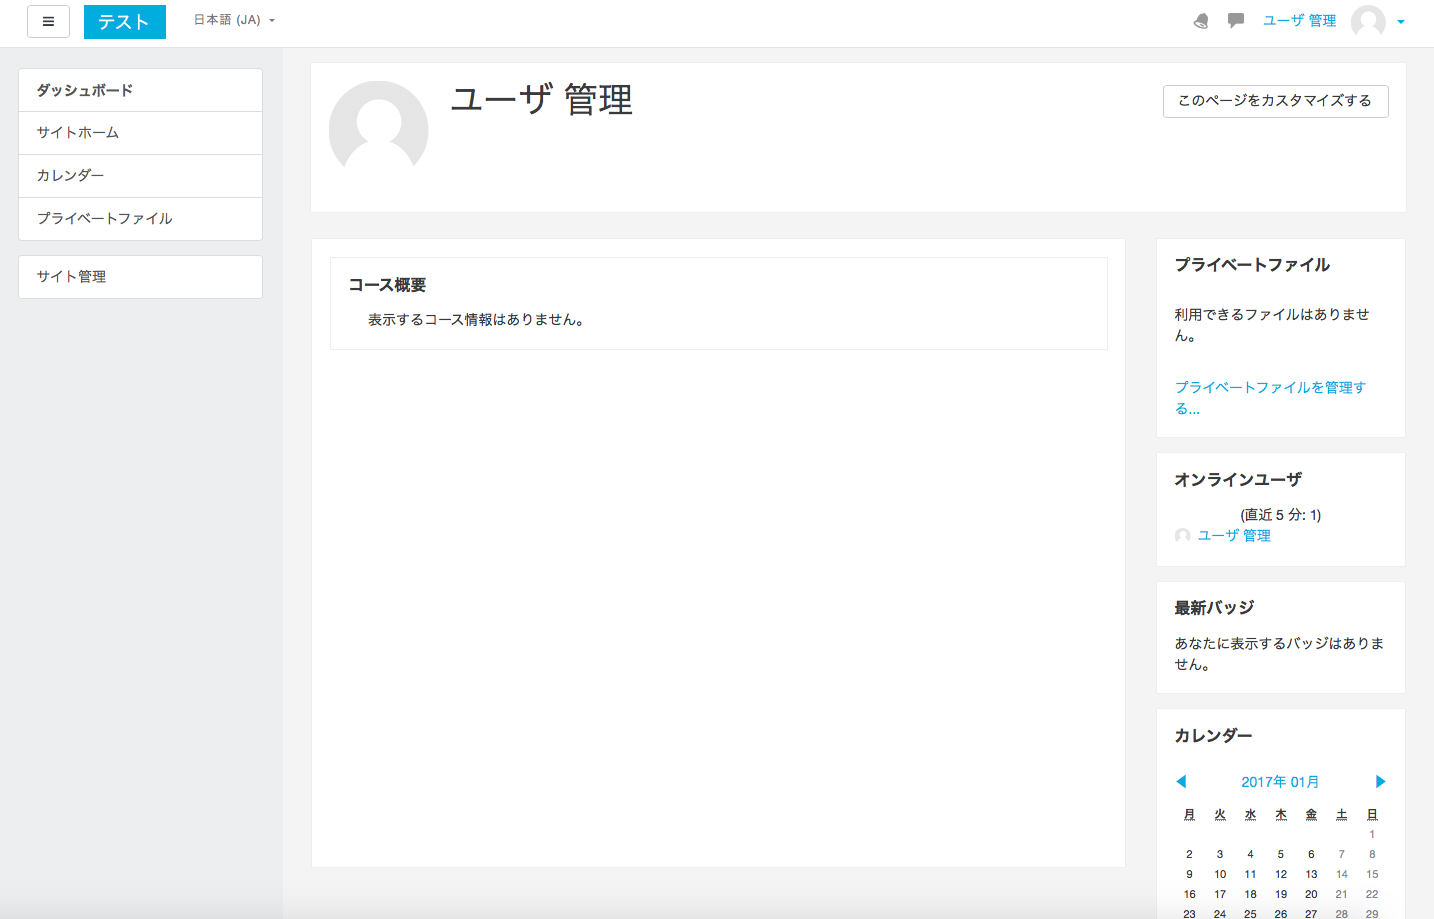
initialization completed
If the above screen appears, the initial settings have been completed.
Thank you for your hard work. But this is just the start. You would have thought that after all this work, we would have needed to do so much just to prepare.
I want to use e-learning more comfortably and for free.
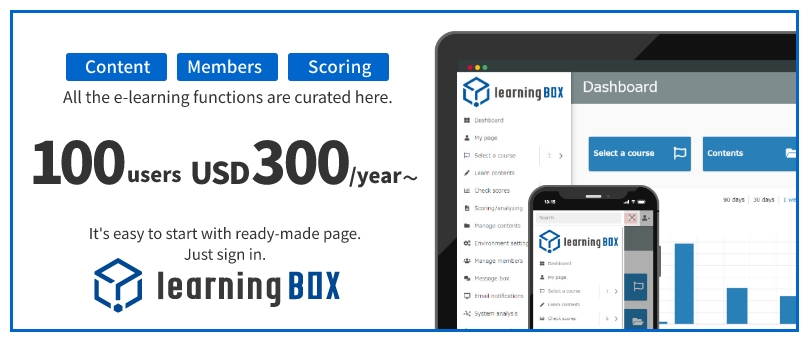
We recommend our learningBOX to those who want to use e-learning more comfortably.
Free for up to 10 accounts. No need to set up any server. Free registration for learningBOX is available at list of optionsPlease register from